Model building notes – Blaster 3

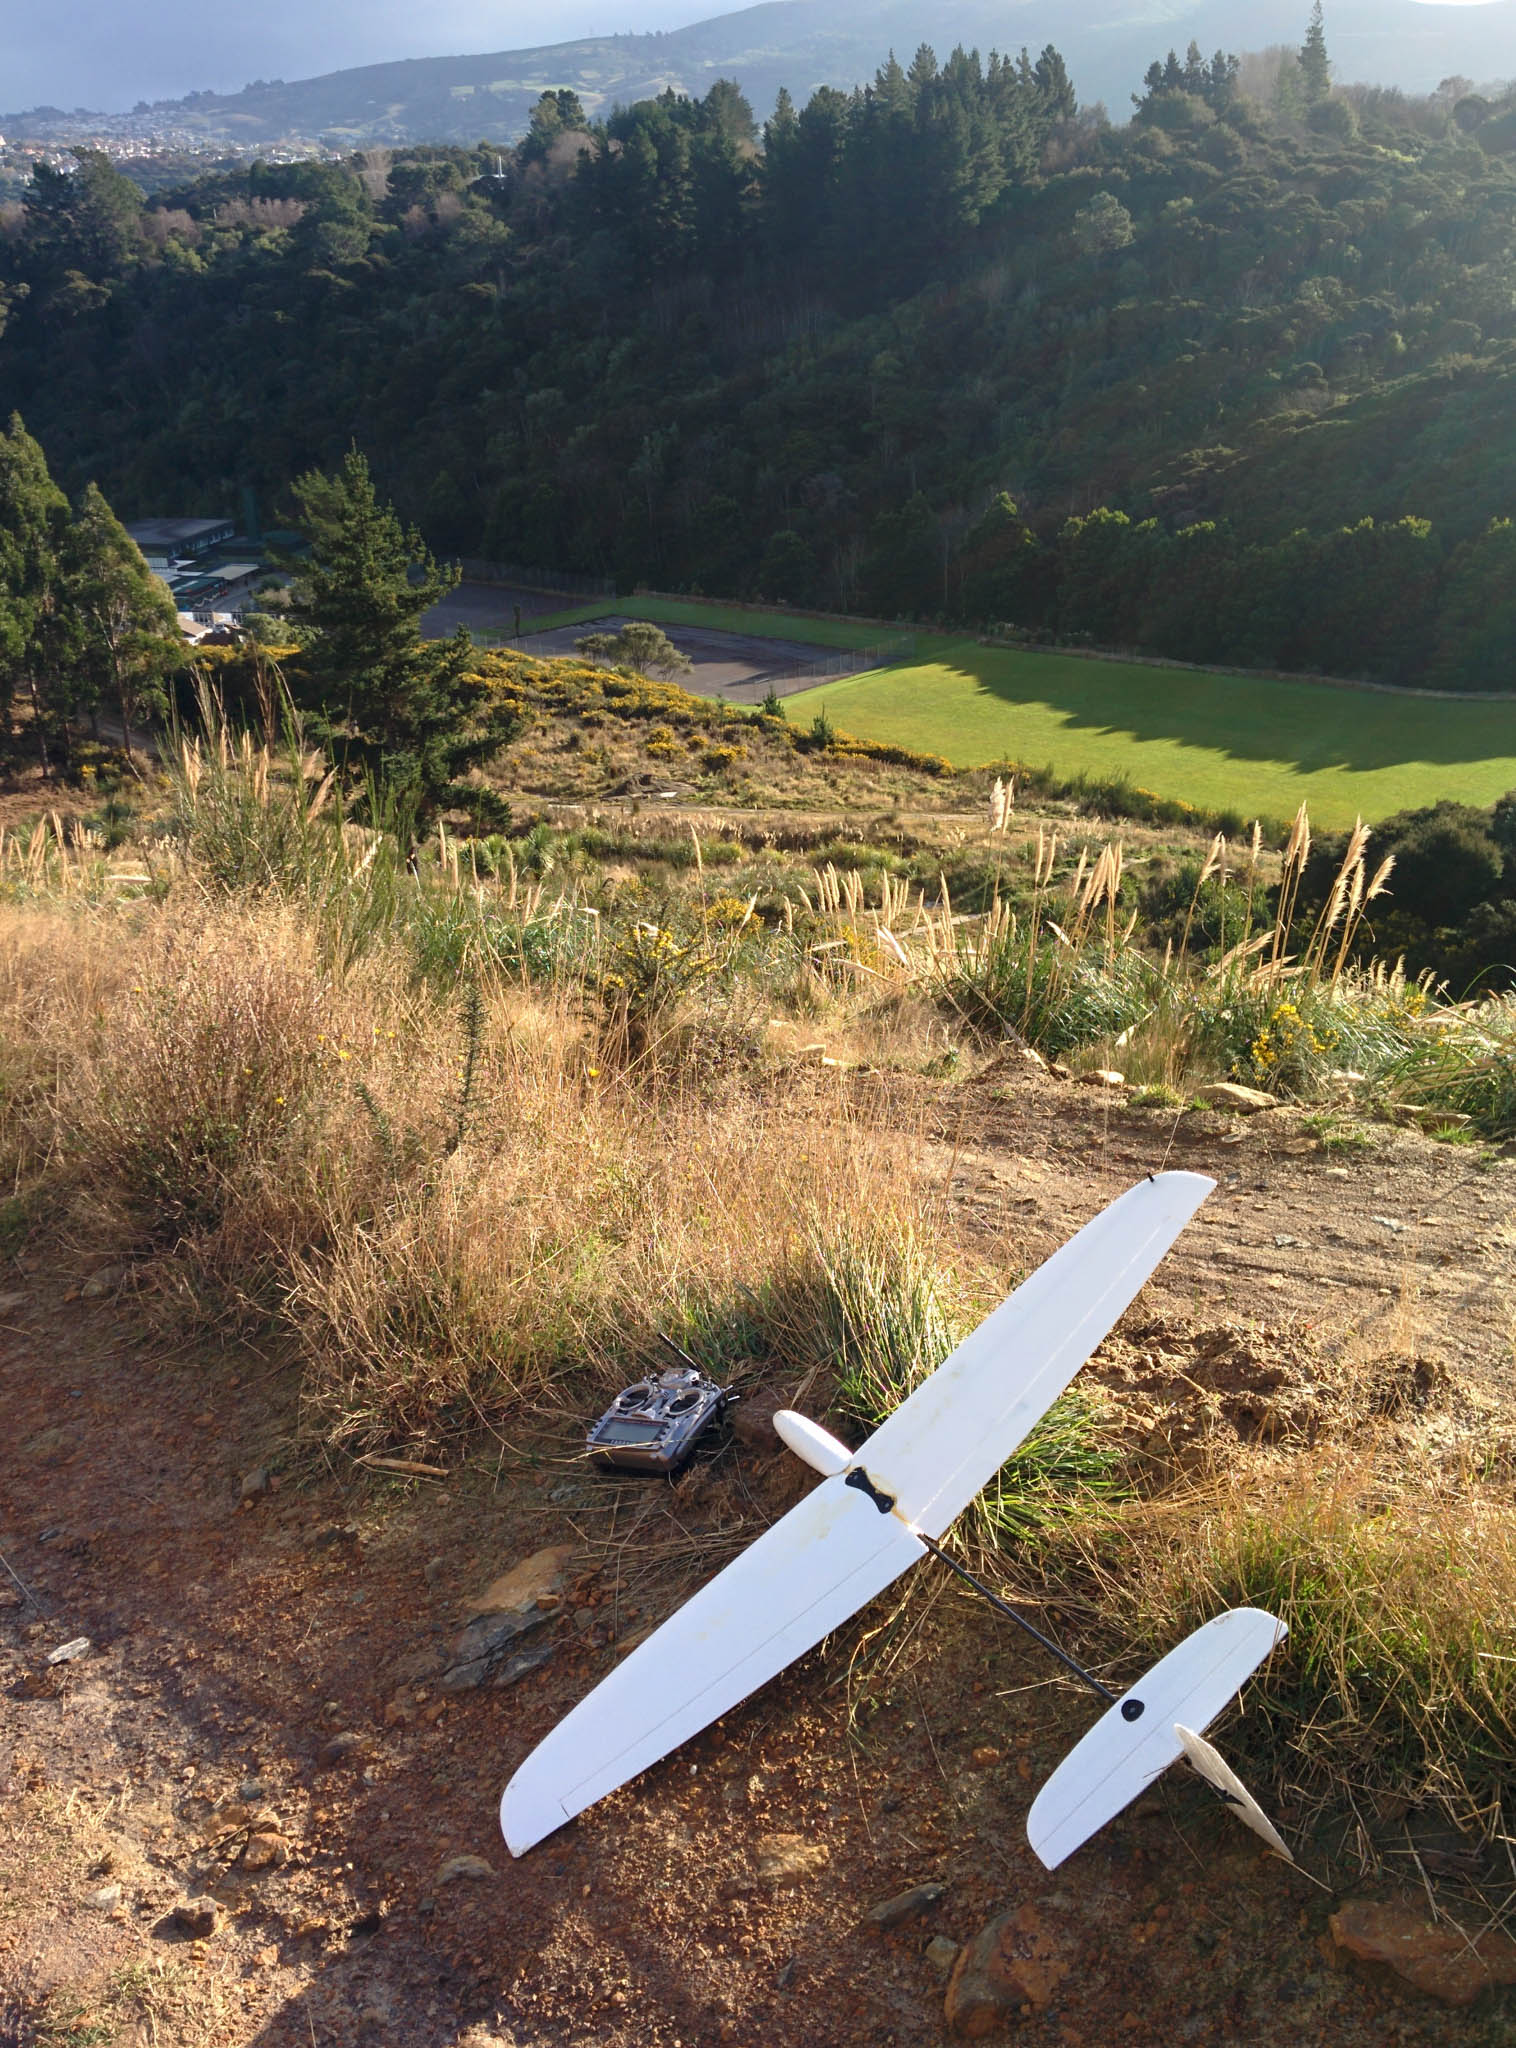
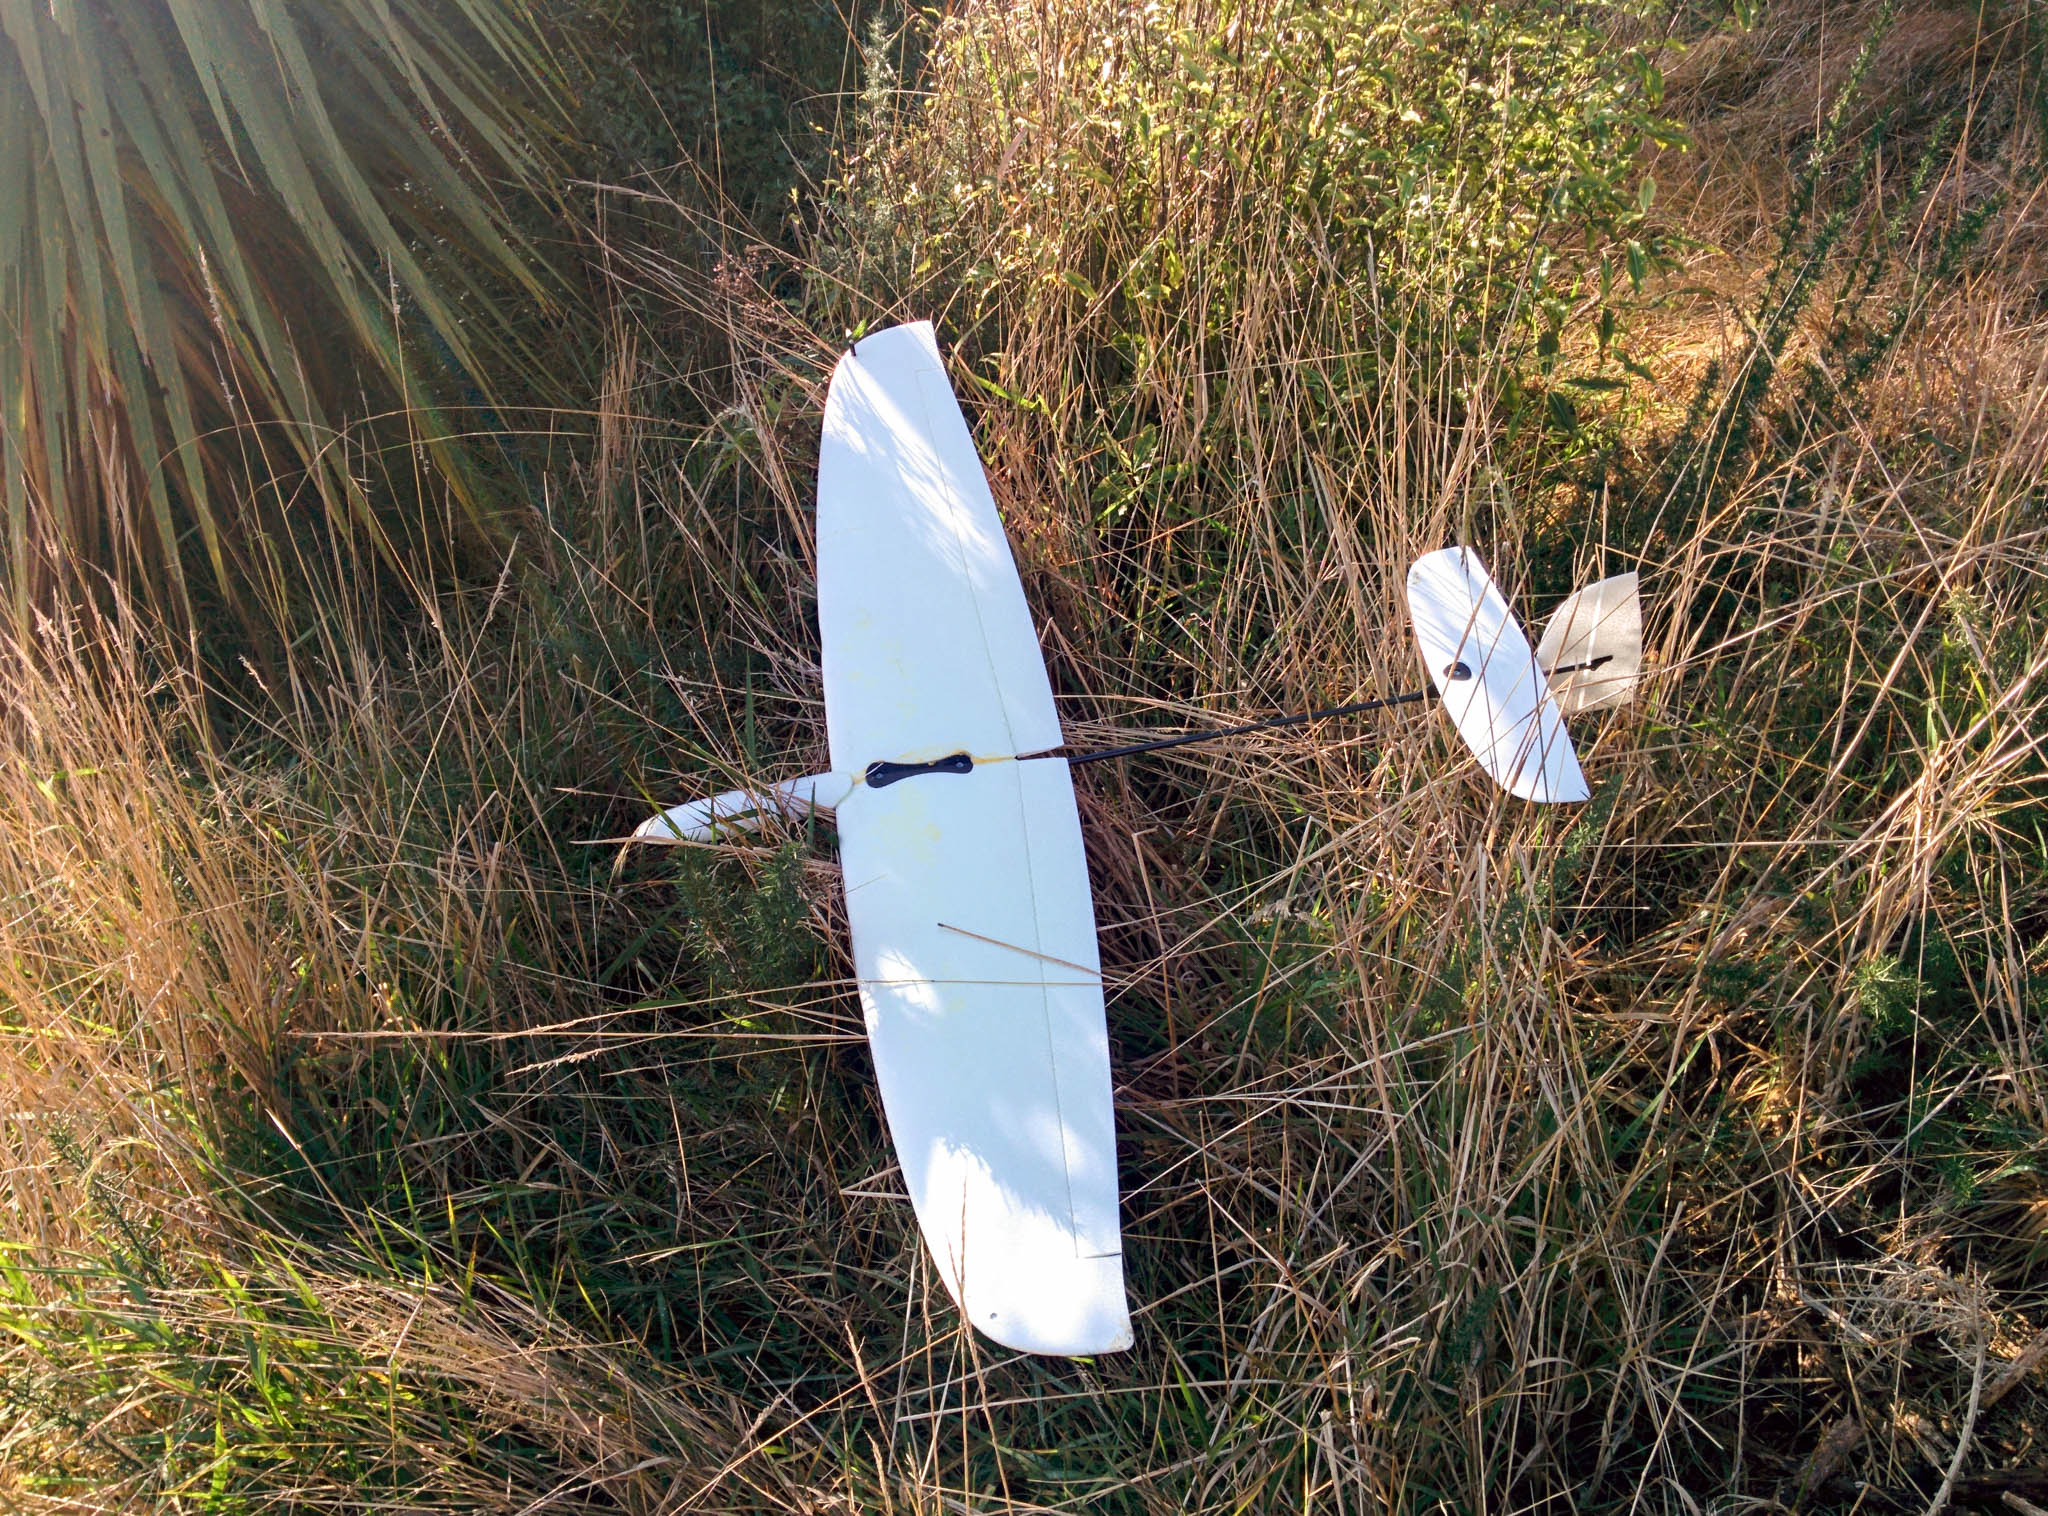
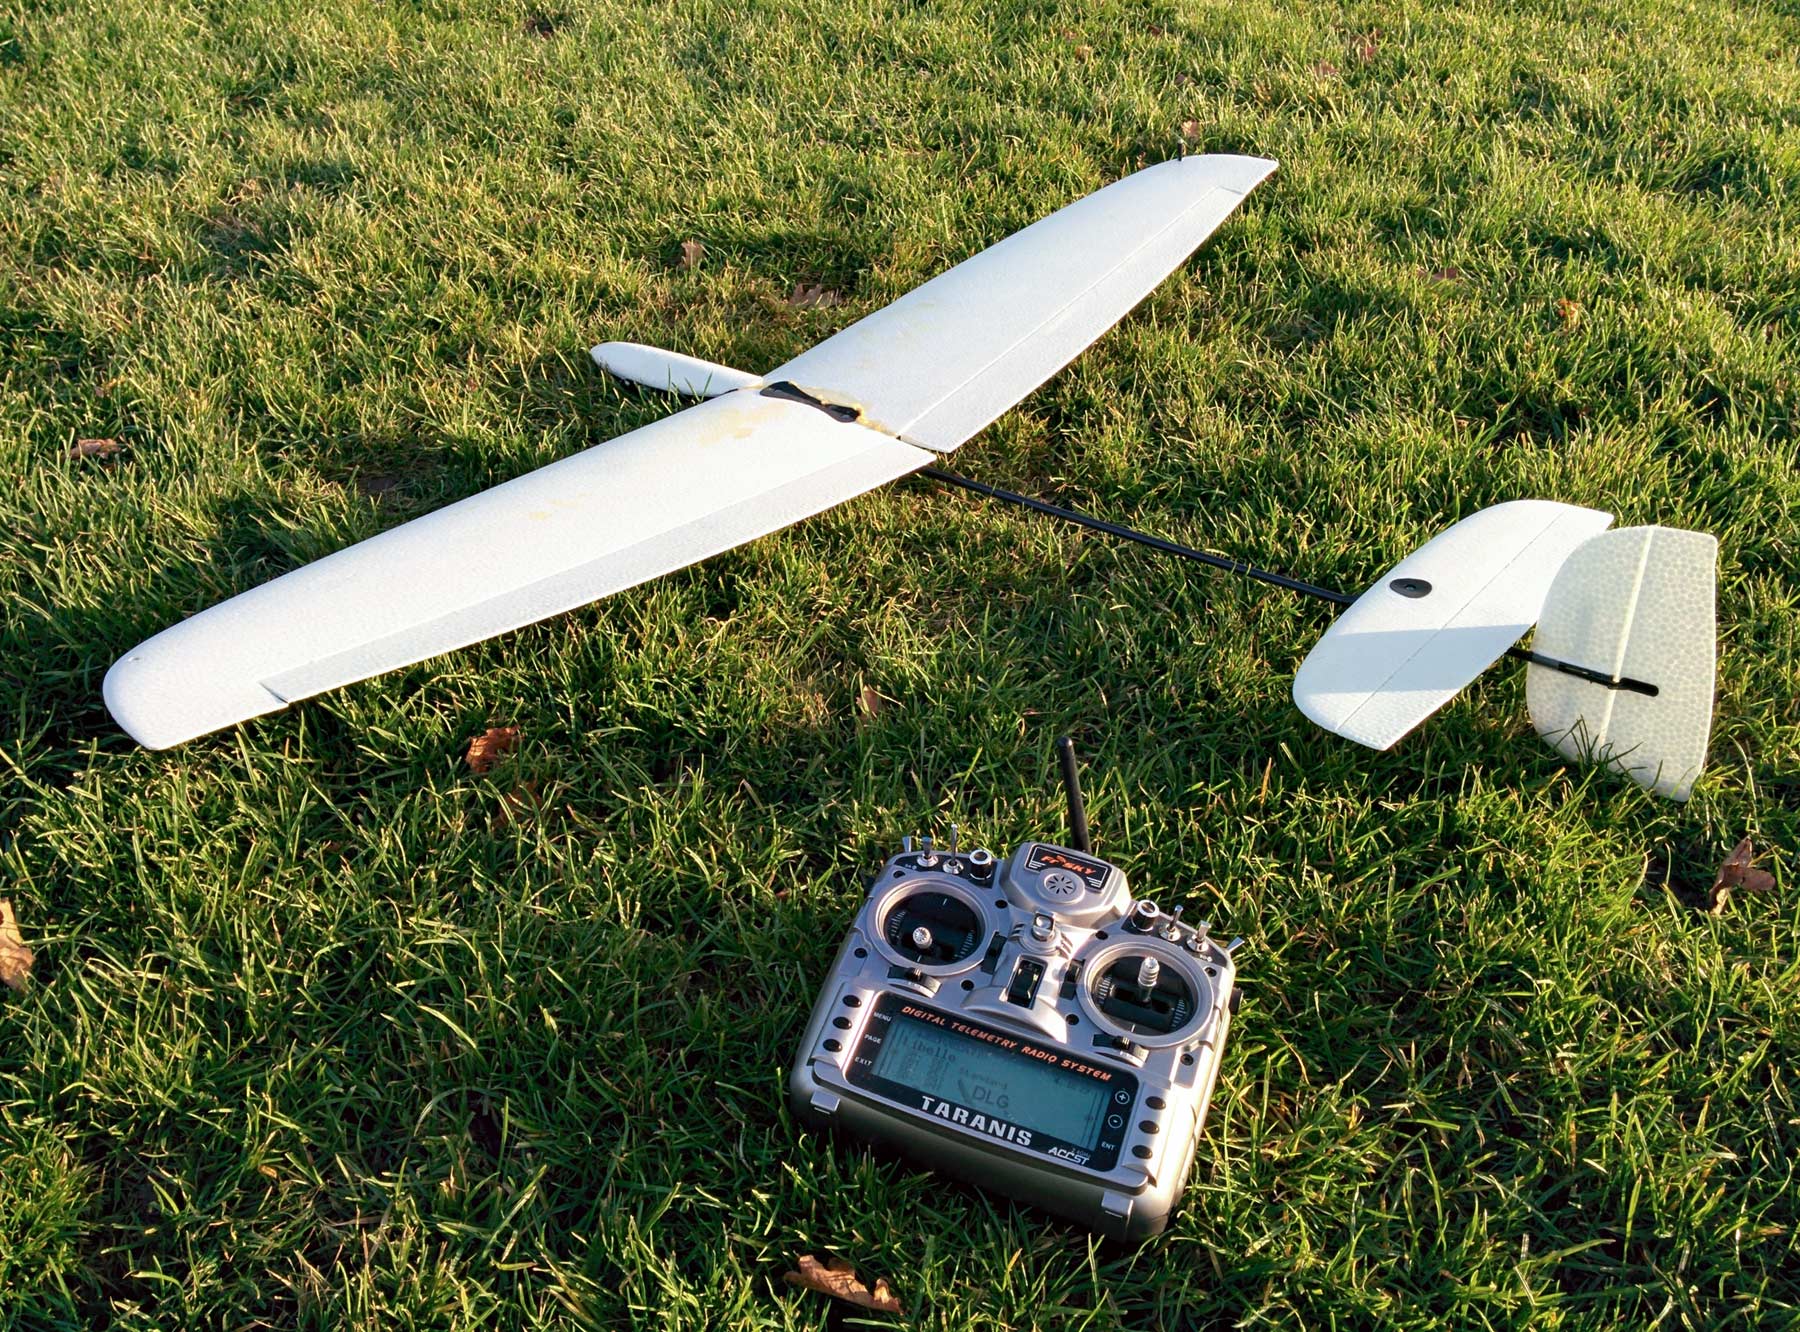
I recently completed my build of a Blaster 3 Spread-Tow Carbon 1.5m DLG, which is a fantastic craft. Here are some notes of the things I learned during building.

This RCGroups thread has all the build notes you could ever need, though you’ll have to read a lot of pages to find all the highlights! Particularly useful is the “view all attachments” feature, which shows all of the pictures in the thread on one page. The Hyperflight store page also has a handy list of recommended control throws.

The official manual doesn’t mention how the horns should be placed relative to the hinge line of the control surfaces. I believe they should be positioned so that the hole in the horn is directly above the hinge line.

If you’re a left-handed thrower, the rudder’s horn should also be on the left side of the craft (so it’ll effectively be hidden by the rudder when you’re holding the glider by its peg ready for launch).

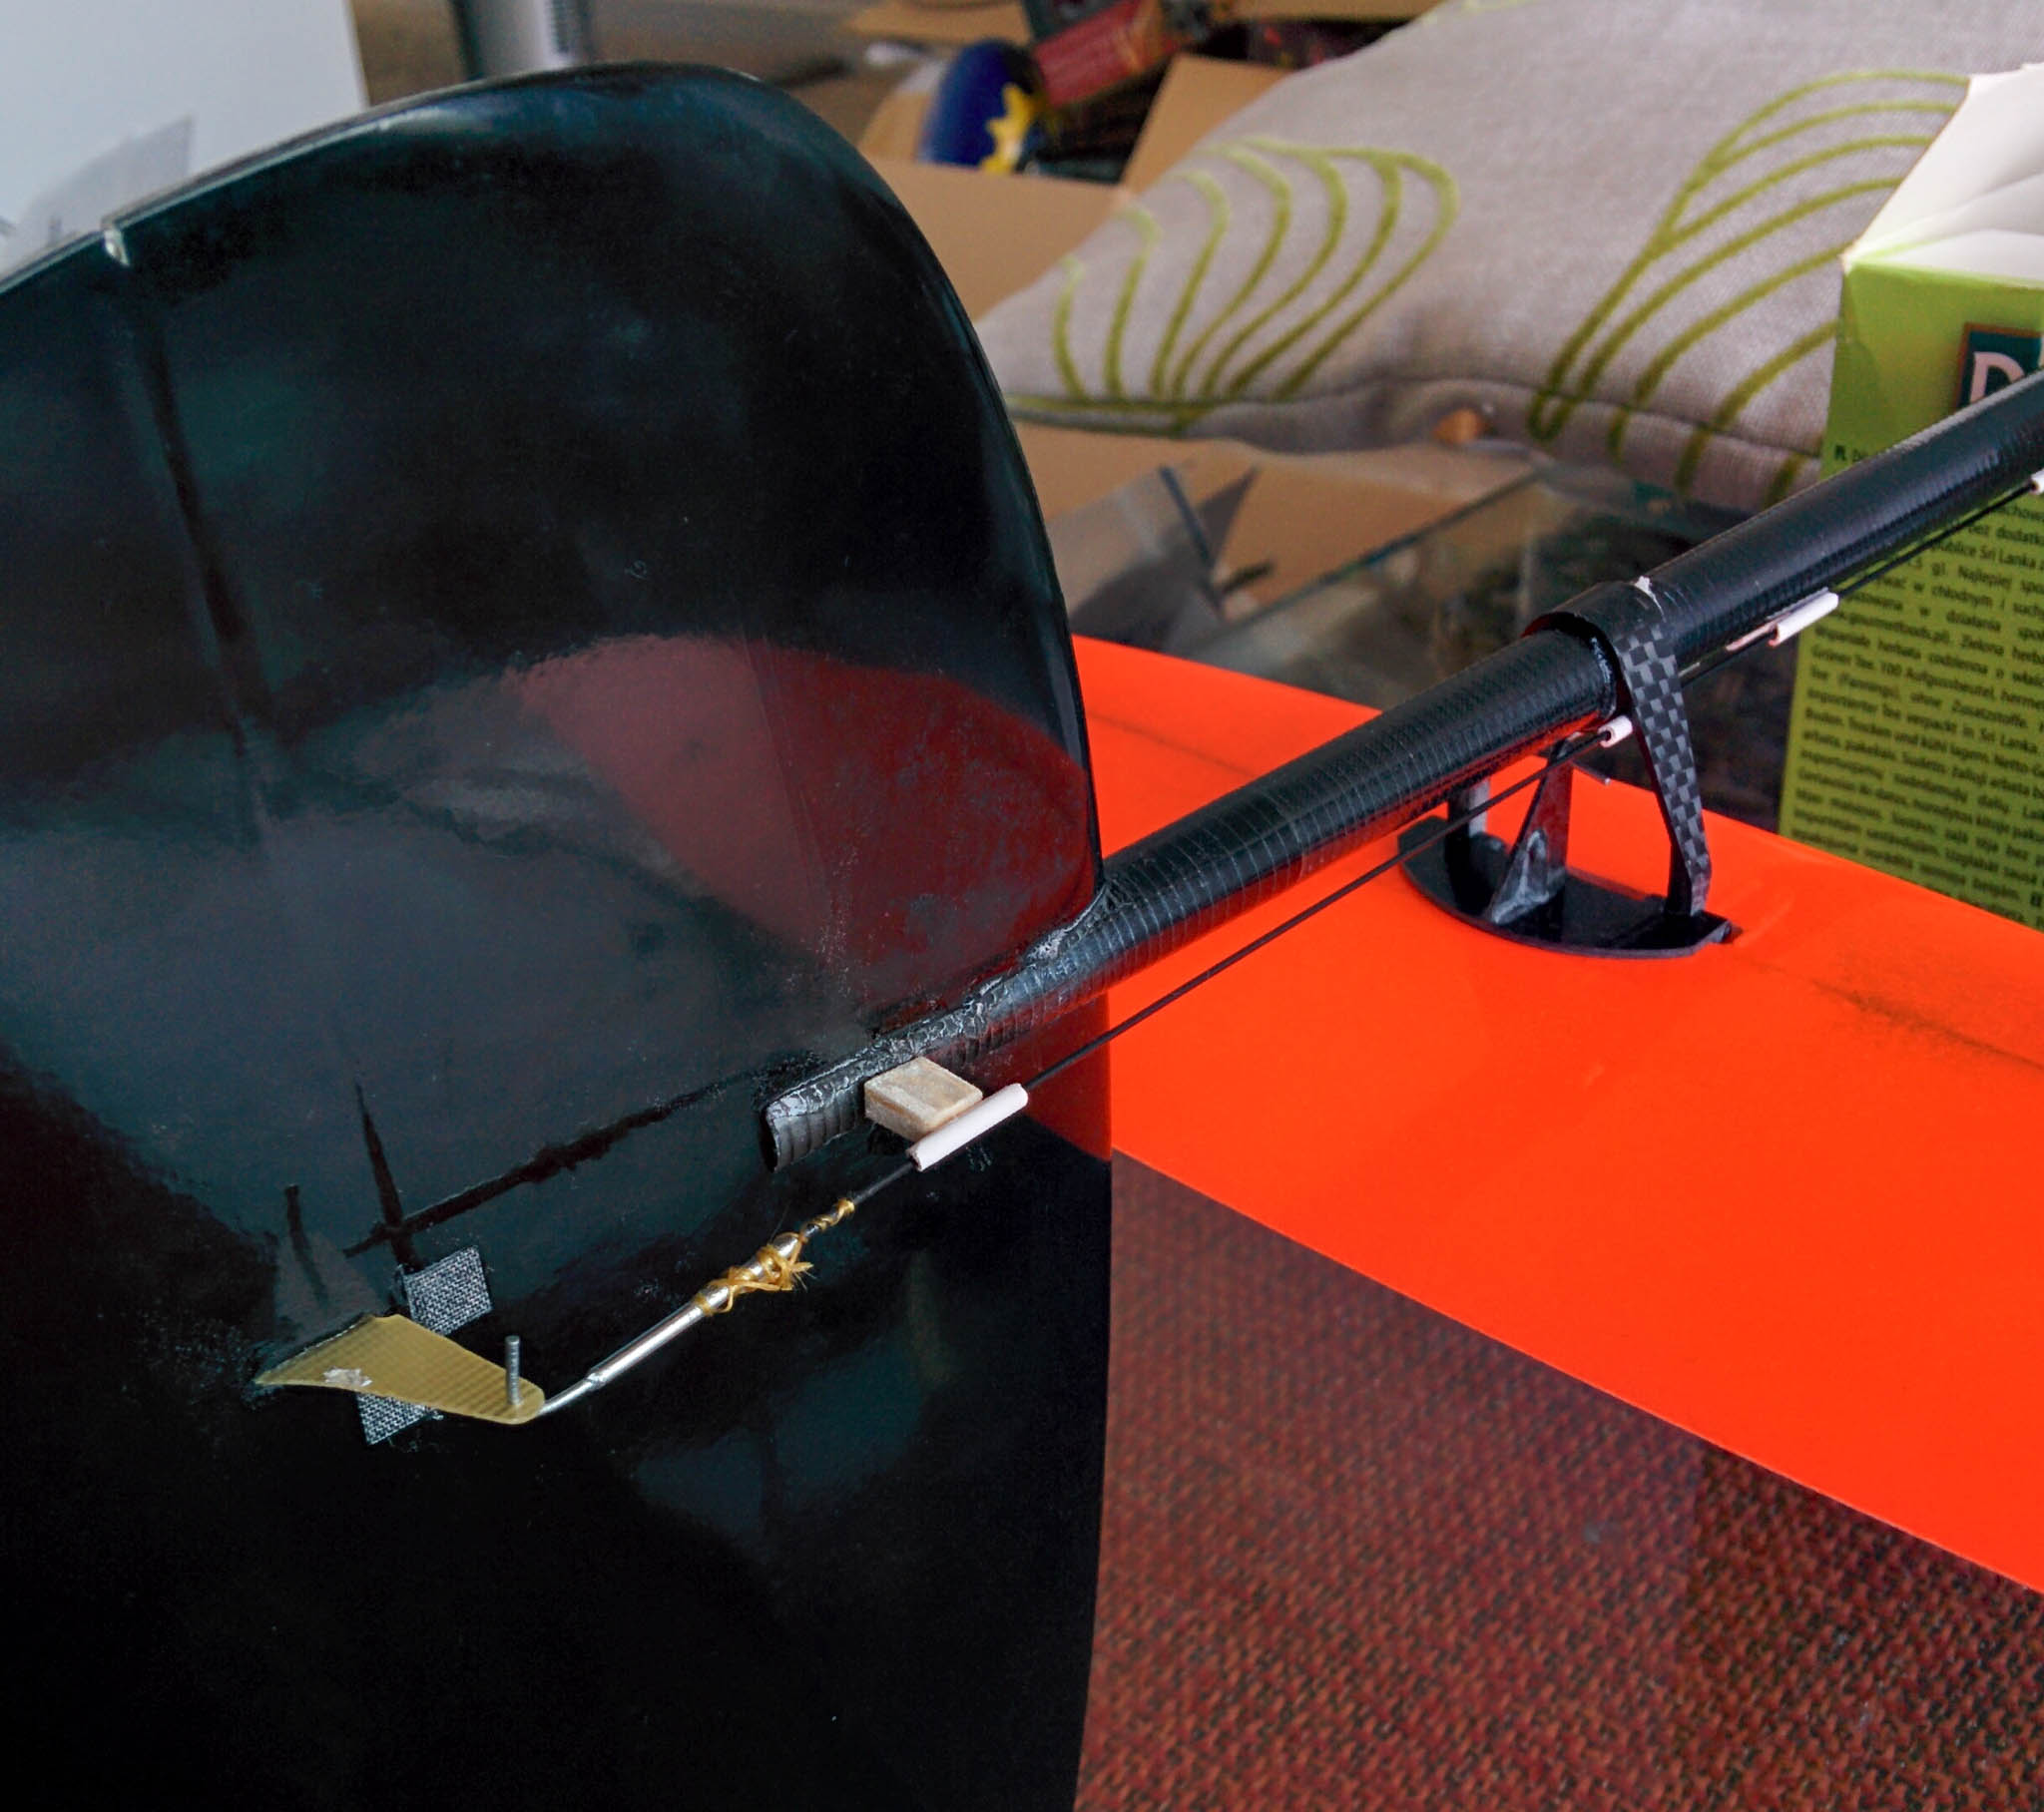
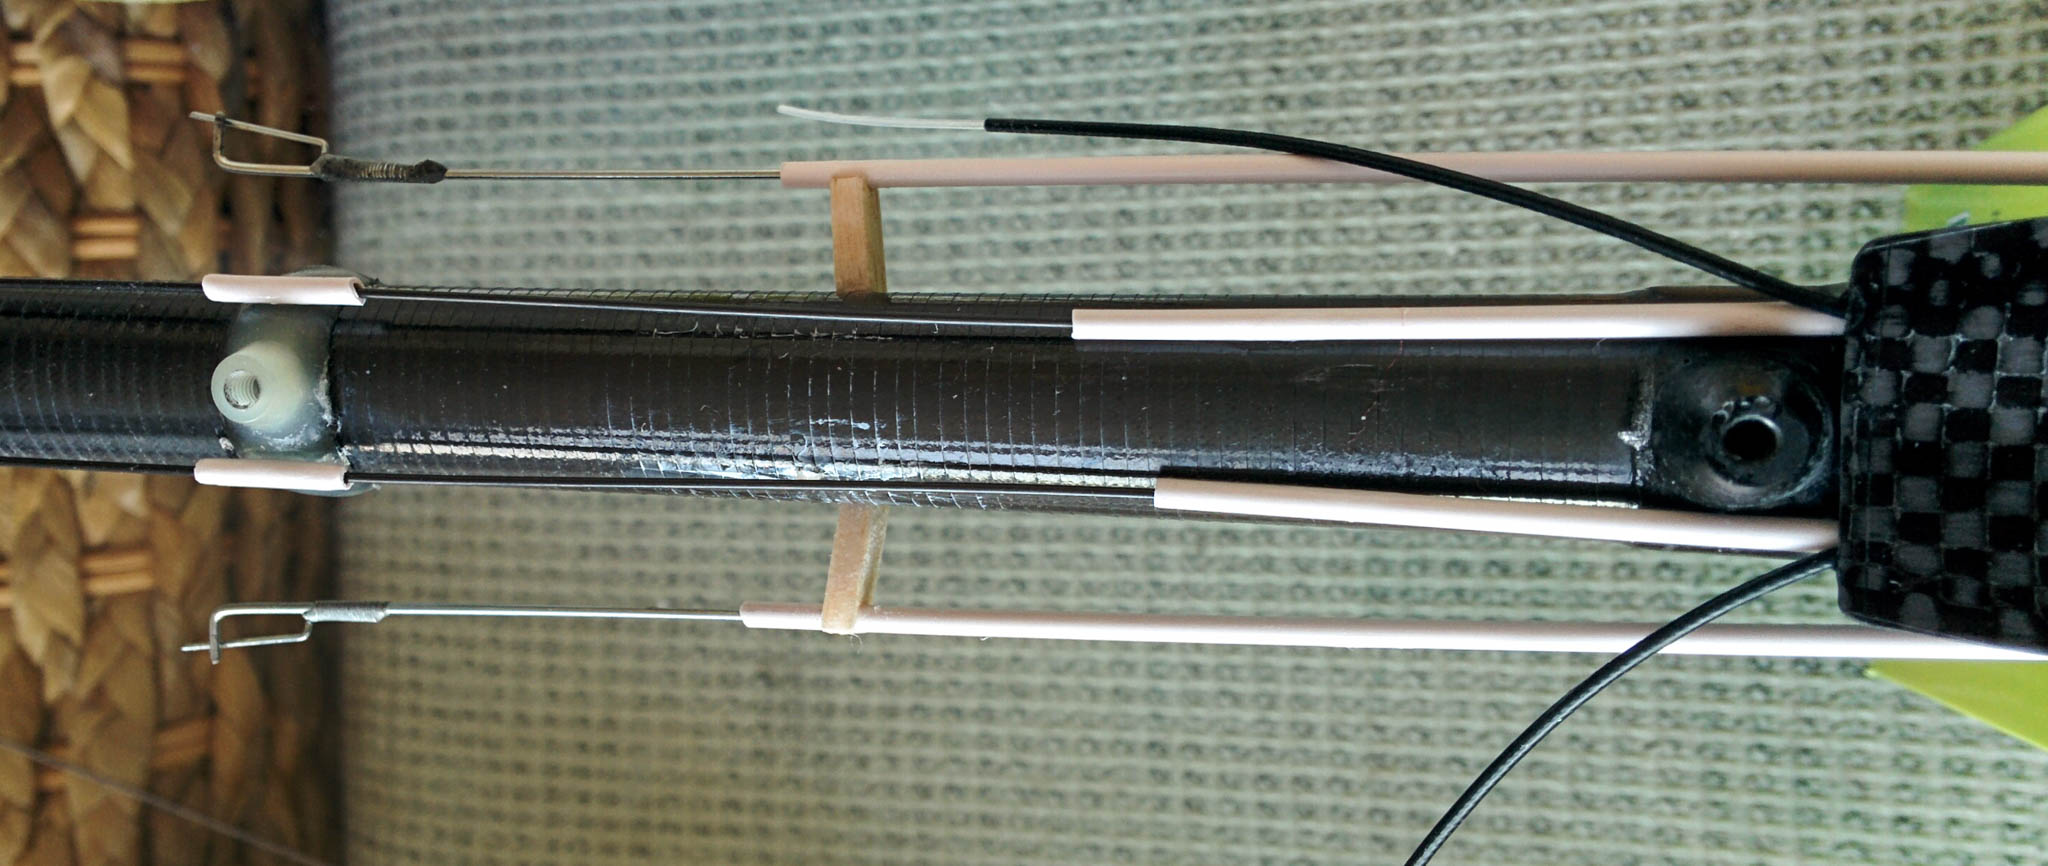
When gluing the V-mount and rudder to the tail, be sure to scuff up the surfaces first with some sandpaper, and then clean the carbon parts down with acetone to remove any leftover release agent (from the moulding process). This will ensure a secure glue. After carefully aligning the V-mount, I glued it to the boom by wicking thin CA into the crack between it and the boom. A small balsa spacer was added to align the last control rod sleeve with the rudder. I also glued the vertical stabiliser using thin CA.

I found that the manual’s suggested aileron pushrod placement (exiting through the top of the back of the pod) required them to be ridiculously bent, and the force required to move them was too high. Instead, I drilled slots in the back of both sides of the pod (at the level of the servo arms) which allowed the aileron horns and the servos to connect together in a straight line. This also gave me more room for my antennas to exit the back of the pod alongside the rudder and elevator pushrods. A small round file can be useful in extending the drilled hole into a slot shape.

In compression, the aileron pushrods would bow near the ailerons. To fix this, I glued balsa supports between the aileron pushrod sleeves and the boom to hold them in place. By happy coincidence, these supports ended up being at the 80mm suggested CoG location, so I can use them as a CoG reference.

Balsa supports for aileron control rods

This is a popular modification, so there are lot of pictures of it for reference on the RCGroups thread, like this from Brain52.

When cutting the PTFE pushrod sleeving into 10mm lengths for the elevator and rudder pushrods, I found that the ends of the sleeves were getting crushed flat by the cutting action. I squeezed them in the opposite direction with a pair of pliers to bring them back to round, but the shape was still imperfect, and the friction with the pushrod was extremely high. To fix this, I slid the sleeve segments onto a piece of piano wire, and then heated them with a hair dryer. This allowed the sleeving to relax back to its former shape, and the friction dropped away to just about nothing. You’ll know if you got this right when the sleeves can slide up and down the wire on their own (under just their own weight).

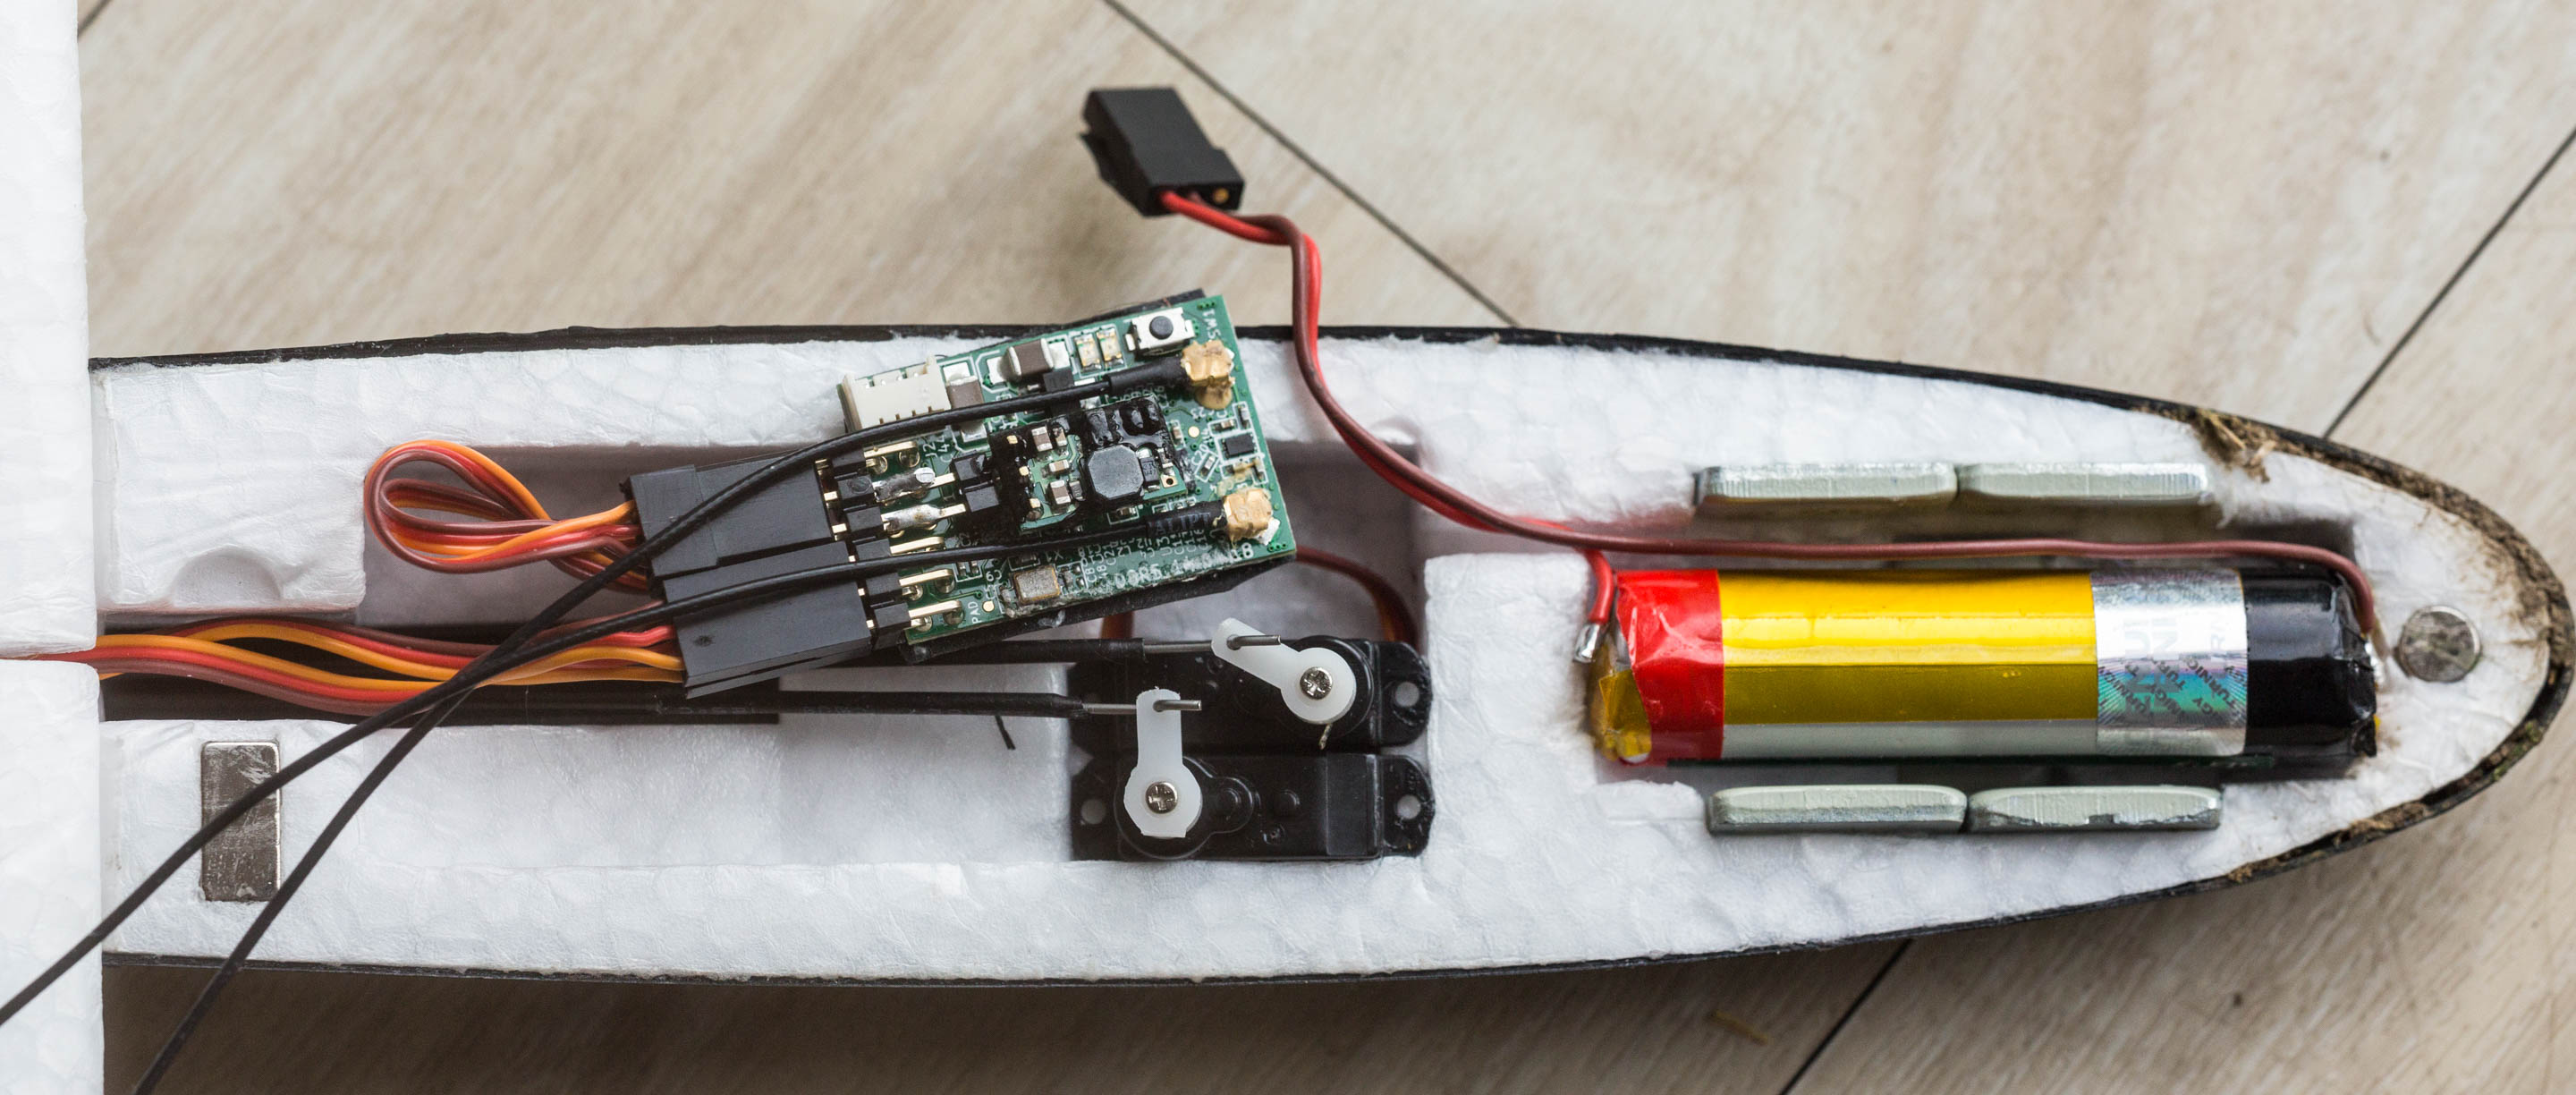
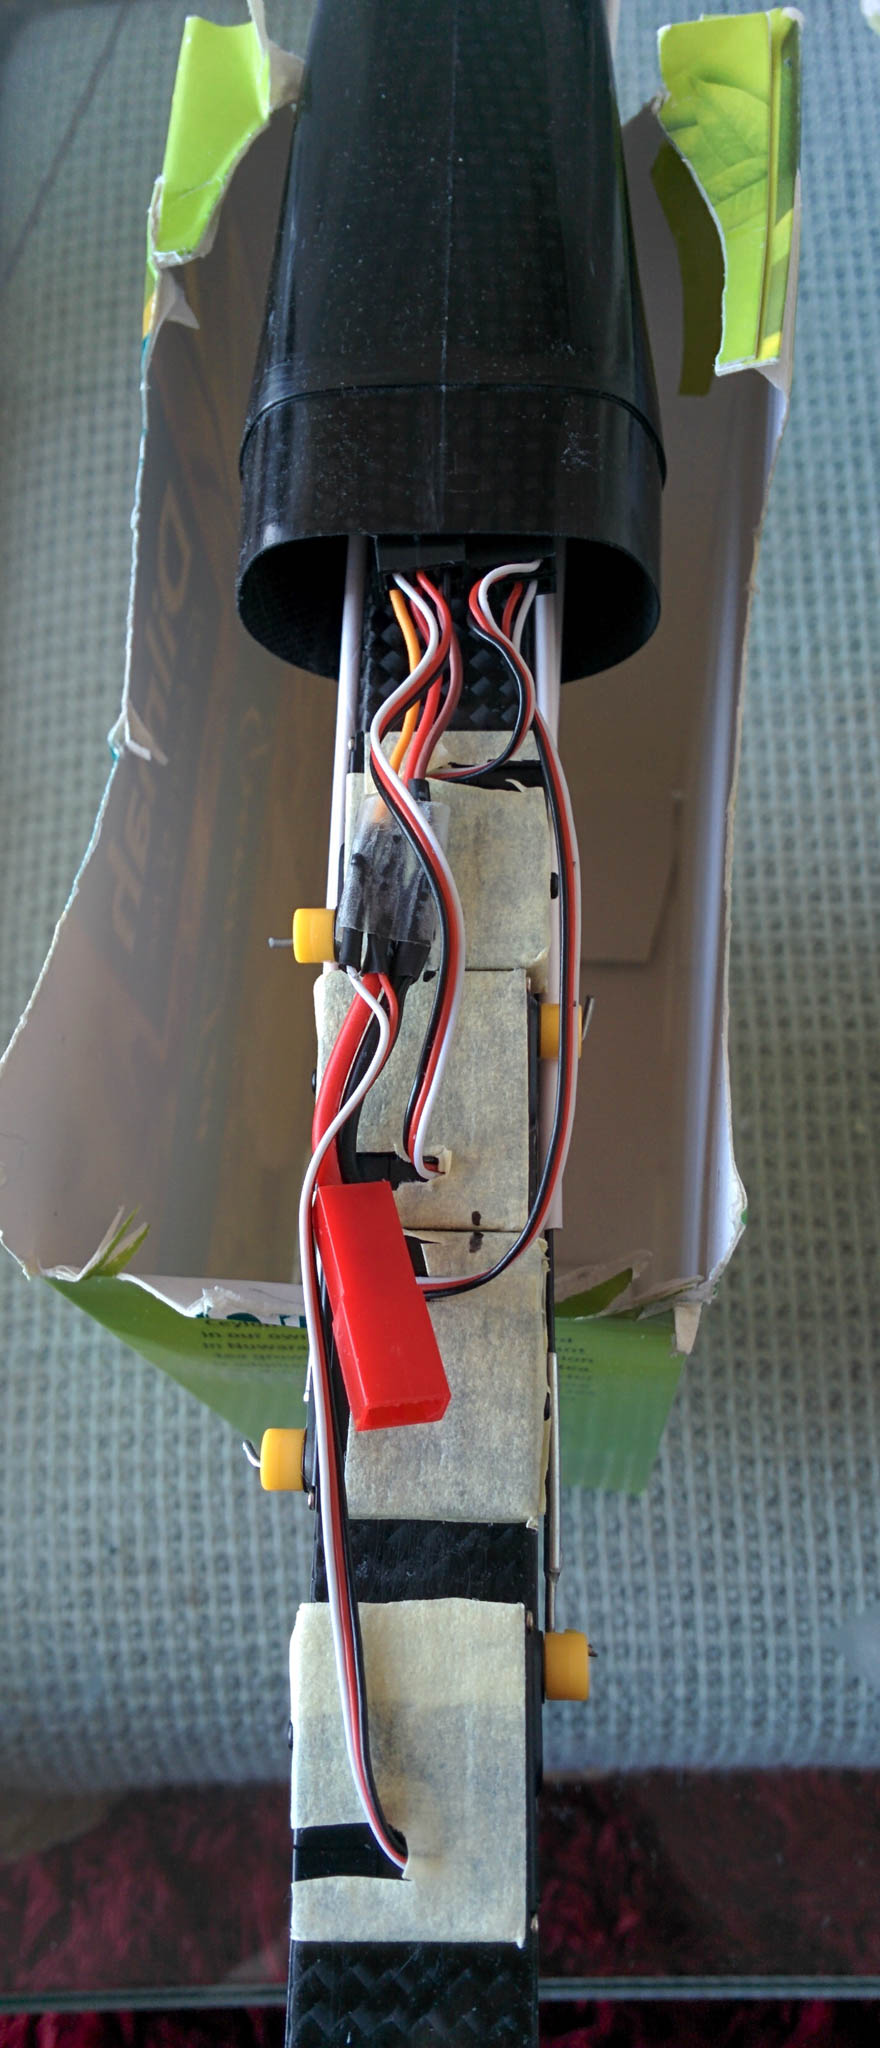
If you choose your servos carefully, you can use a 2S LiPo battery to power everything. I’m using the Ripmax SD100 servos (Dymond D47 clone), which can tolerate the 8.4V of a fully-charged 2S battery. This way, you don’t need to use a voltage regulator, and FrSky telemetry-enabled receivers can transmit the actual battery voltage down to the ground without adding additional battery voltage sensors.

If you glue a servo in the wrong place, don’t worry about it, this is why you wrapped the servo in masking tape. The servo can be cleanly pulled off the tape, leaving just a square of glued tape behind on the boom, which can be removed with acetone.

Because the ailerons need such a large throw to allow for braking, I used longer arms on the aileron servos. This also allows room for the sleeves of the rudder and elevator servos to pass by within the arms of the ailerons.

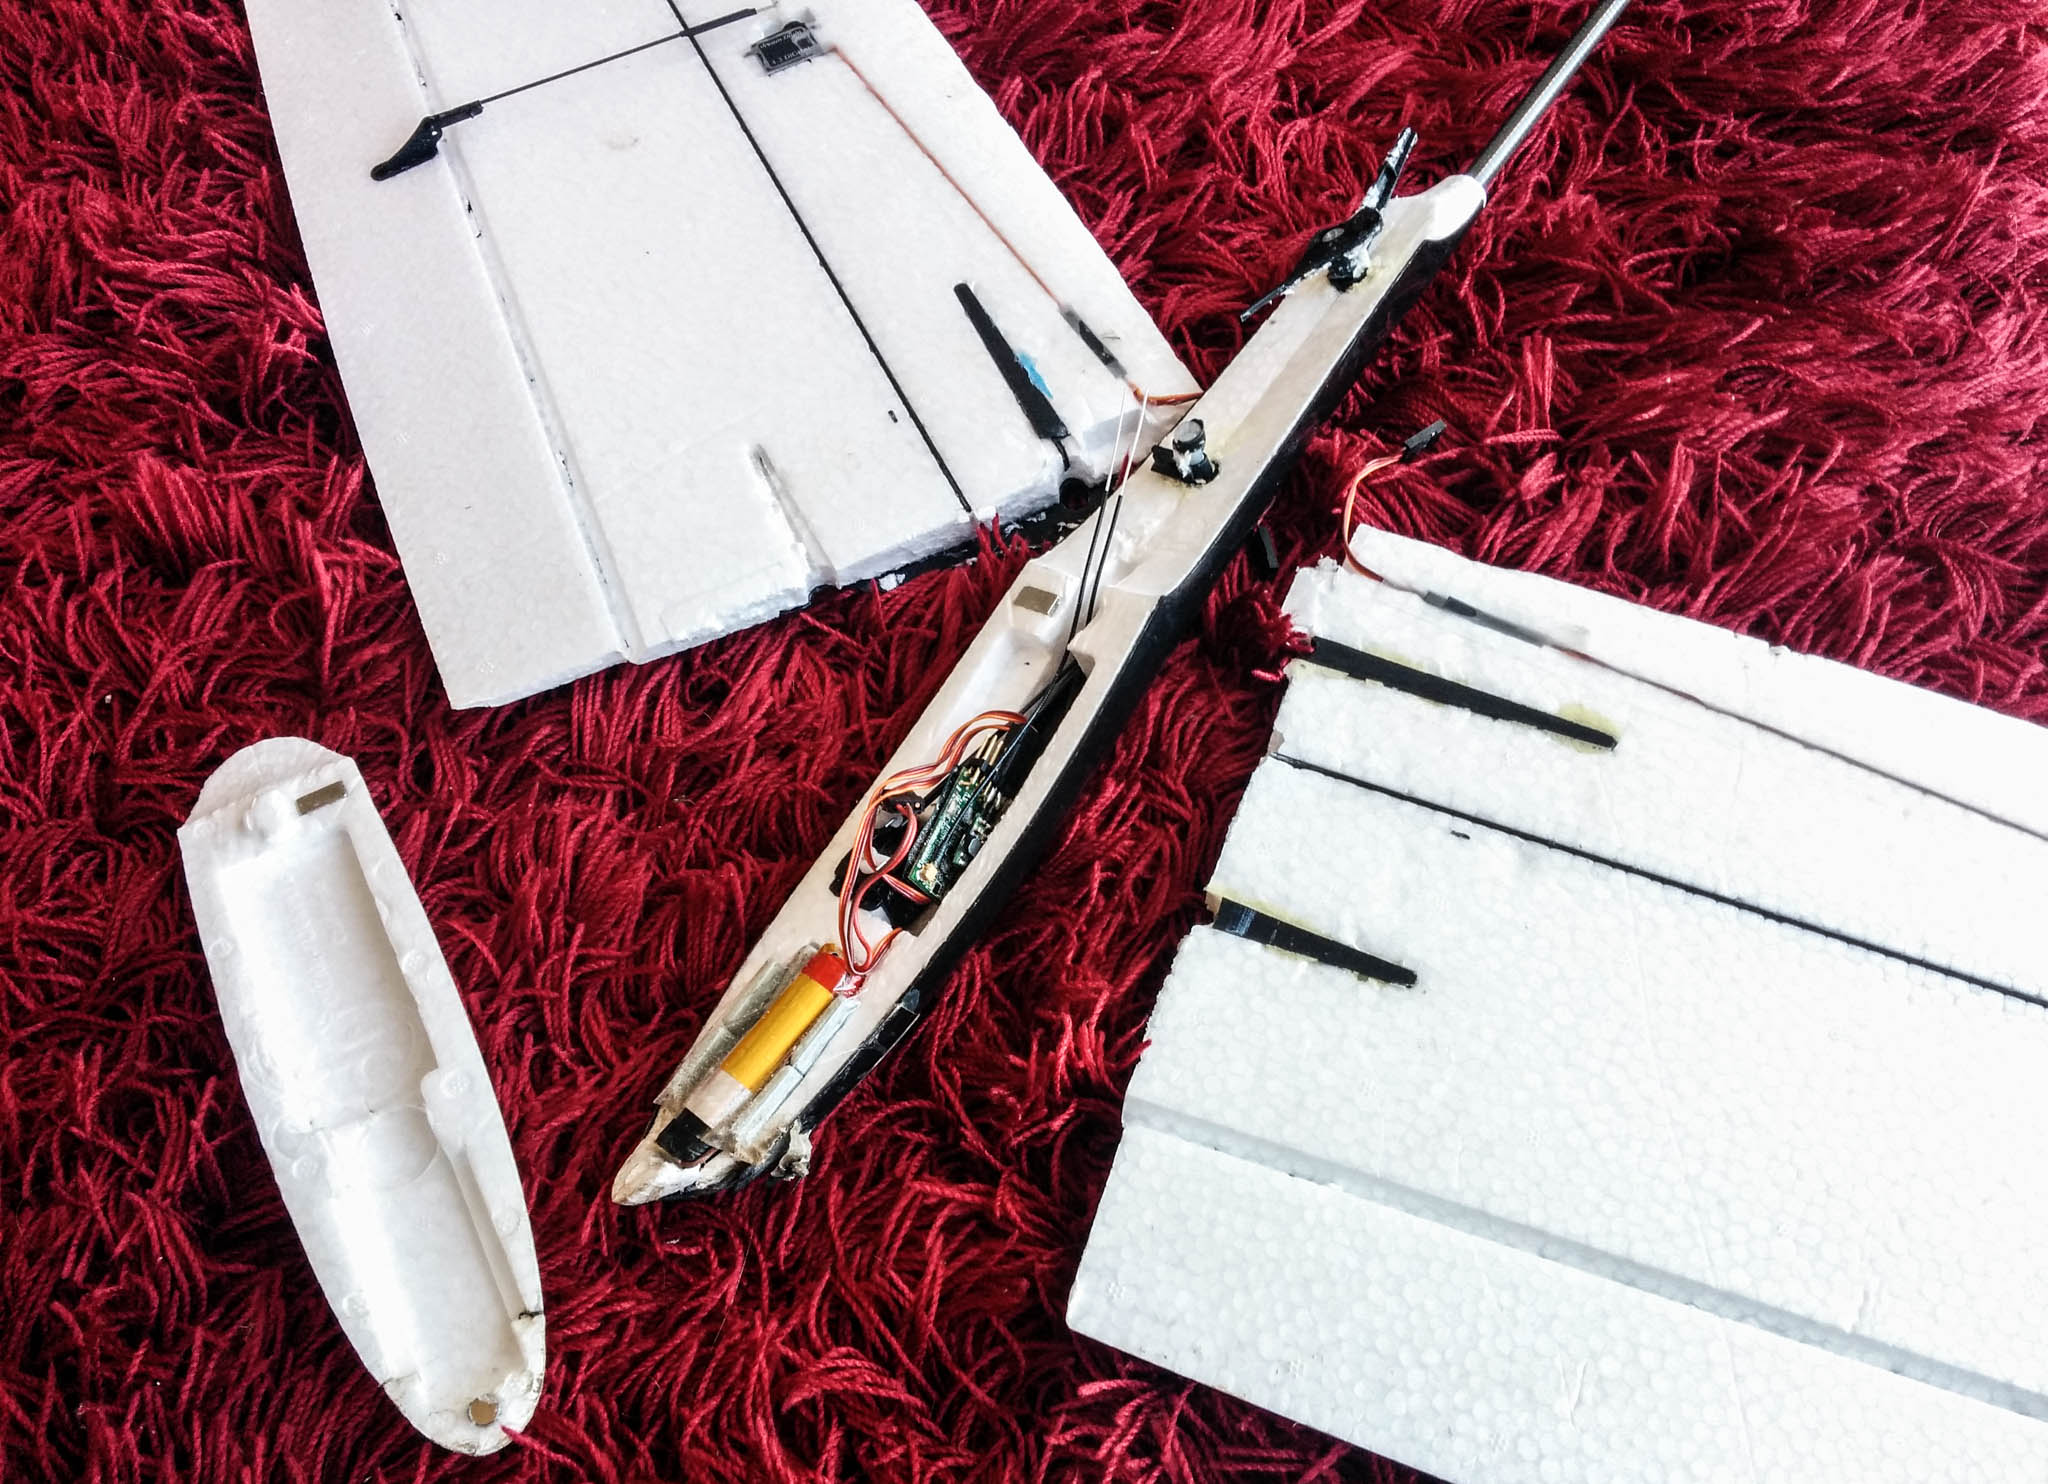
I’m using the Turnigy Nano-Tech 300mAh 2S 35-70C as a battery, which is a little too tall to slide all the way to the front of the nose, so mine is mounted about 10mm further back. Because there’s so little vertical space available above the servos, the JST battery connector is a bit too thick to fit nicely above them. It works acceptably for the moment, but I plan to replace both the main connector and balance connector on the battery with a single servo connector.

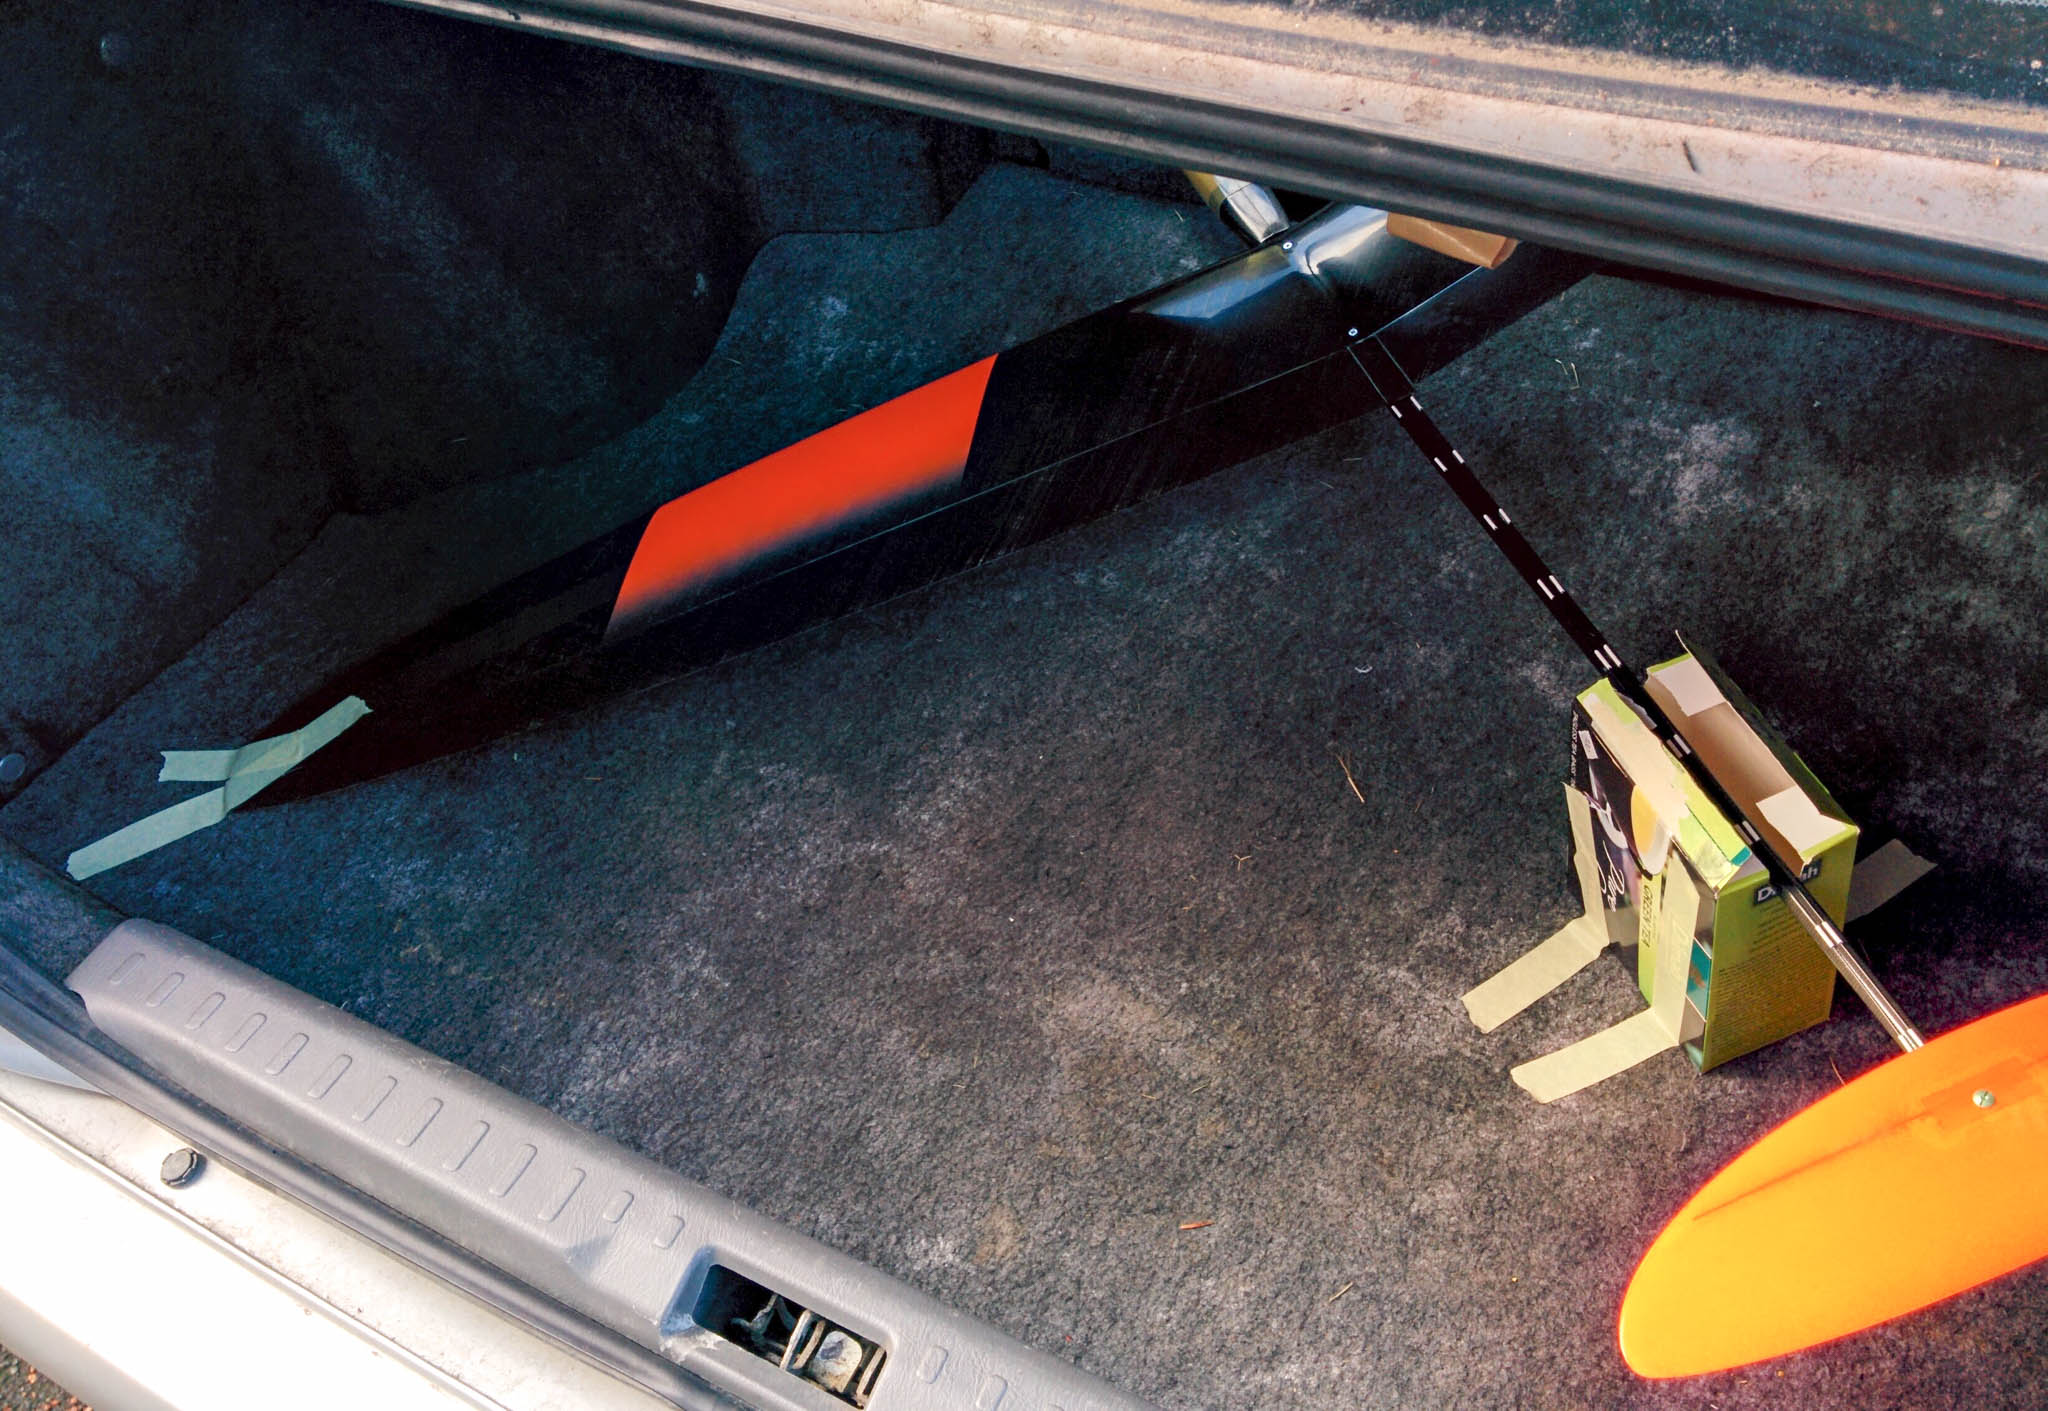
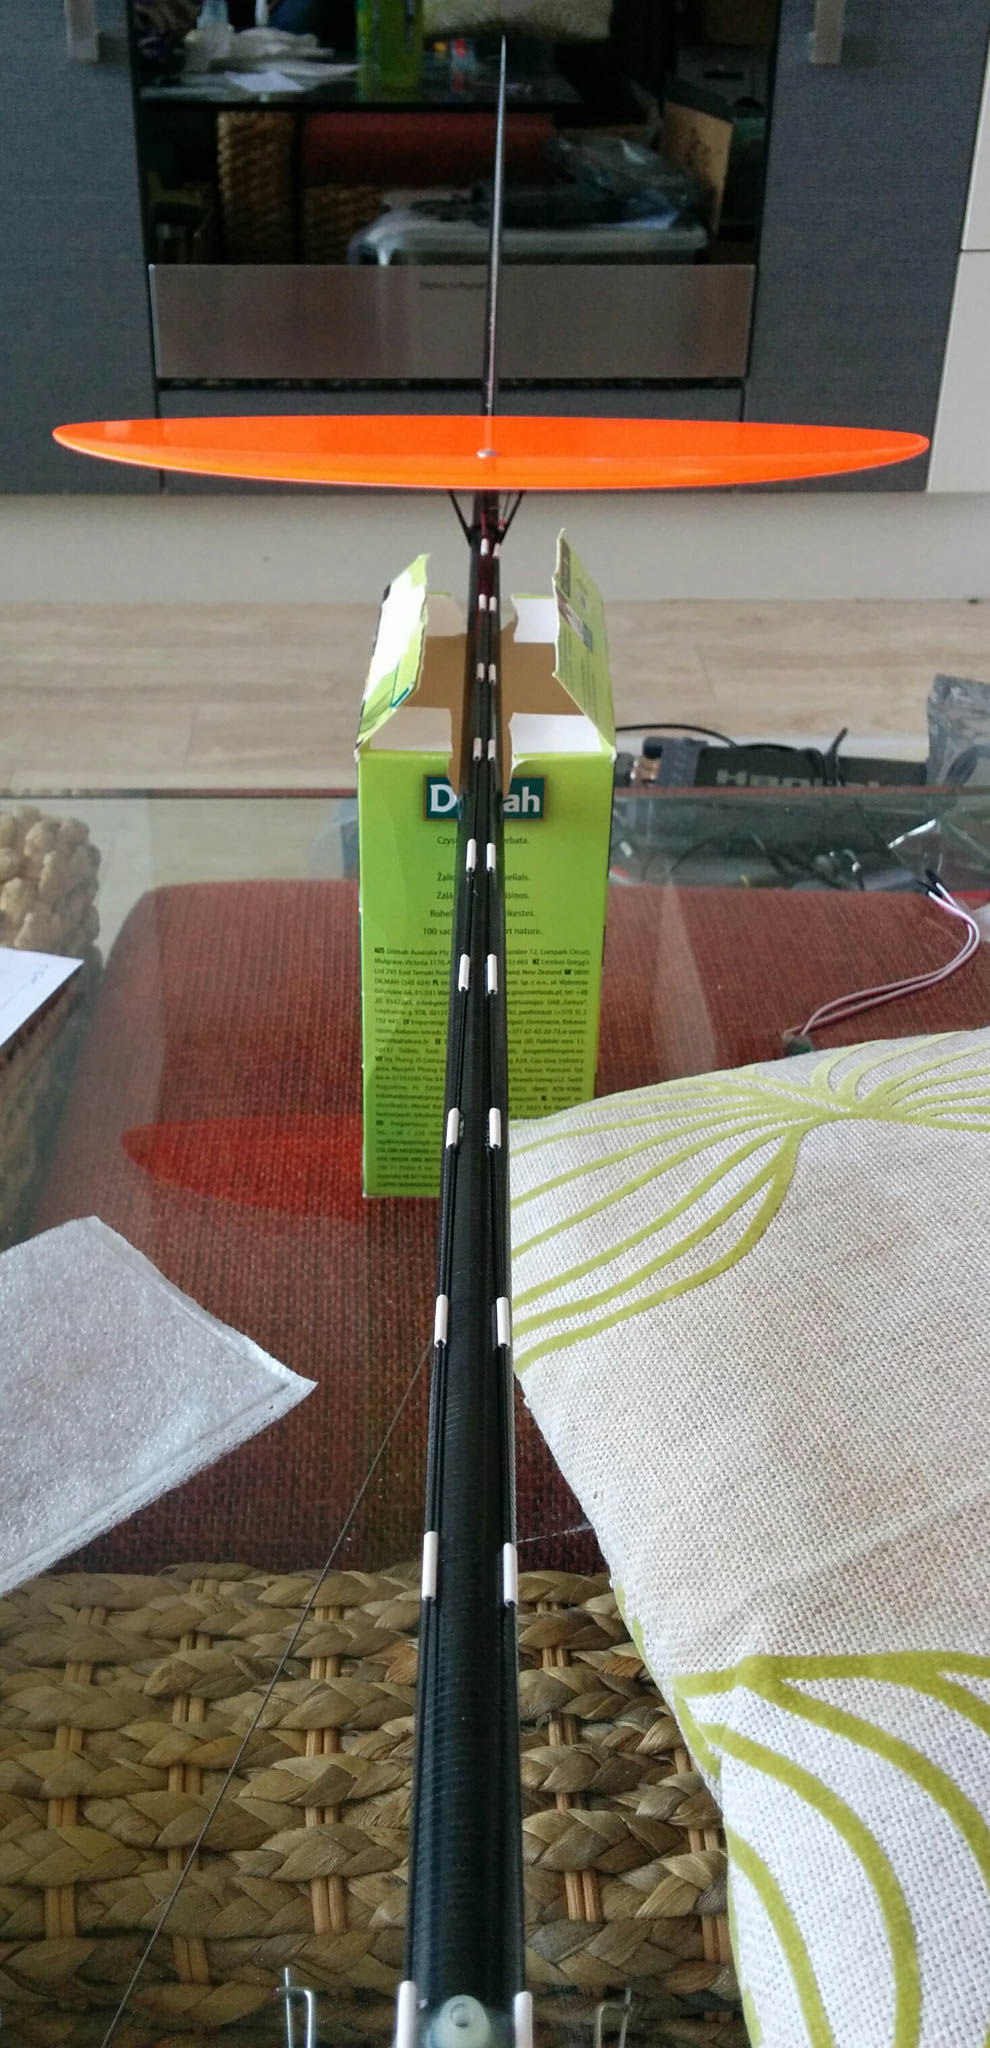
I was worried that the Blaster wouldn’t fit in my car (Nissan Primera), but it turns out that I can fit it in the boot (trunk) if I fold both back seats down. I cut a slot in the top of a small cardboard box to act as a stand to hold the tail surfaces off the floor, then used masking tape to attach the left wingtip and the nose to the carpet. This holds the glider very nicely in place while driving.


Slope soaring at the beach

North-east wind flow over Aramoana beach

Today it was a beautiful blue sunny sky with a reasonable North-East breeze, which means that the wind would be coming directly onshore at Aramoana beach. There is a tall cliff a little back from the water’s edge, and I wanted to try slope soaring on this from its base. However, as I drove out there, the wind speed picked up until I was unsure if I’d be able to fly.

I carried my Libelle over the dunes, fighting with the wind the entire way, a little worried that it would pull the wings off. I finally took off and made a test flight over the dunes. But the wind was too strong, so although I was able to stay in the air, the Libelle’s ground track was continually moving downwind.

Continue reading Slope soaring at the beach

Found a new place to soar

I had some really great flights today! Two of the edges of the field I fly at (Opoho Park, Dunedin) are big slopes that fall away into a valley and into the city respectively. I’ve never flown on them before because they’re covered in trees, and there are trees planted around the edge of the field obscuring the view downslope and making last-minute landings impossible. But since my discus throw has been improving, I’ve been able to get enough launch altitude to clear the trees on the edge of the field and have a reasonable chance of safely returning even in dead air.

So today I drove through drizzle to the field and squelched through the mud to the edge of the hill. It’s heavy overcast and 8 degrees with only a breath of wind, so I wasn’t expecting much. I threw four or five tosses alongside, then slightly above and beyond the trees, without having any issue returning back to the field in time for landing. I got bolder and bolder, and flew further from the edge of the hill. This is the view past the cemetery towards the city, seen through a gap in the trees:

Continue reading Found a new place to soar

Profiling Cleanflight and speeding up the Naze32

With the recent release of the SPRacingF3 flight controller and the Seriously Dodo flight controller, both based on the newer STM32 F3 CPU, users have been posting great Blackbox flight logs demonstrating very fast and consistent looptimes. I found this interesting because the F3’s CPU isn’t clocked any faster than the F1 processor that is used on the Naze32 and compatibles.

One major difference between these CPUs is that the F3 has a hardware floating point unit, while the F1 must emulate its floating point support using some very large software routines. Floating point support is used in the IMU (which is responsible for estimating the craft’s attitude) and also as part of some PID controllers such as the new Harakiri controller. It’s not heavily used in any other parts of the code.

But how much time does the Naze32 spend doing floating point operations anyway? What is the total possible speedup available from just adding a hardware floating point unit? Could I speed my Naze32 up some other way?

Continue reading Profiling Cleanflight and speeding up the Naze32

Improving variance in Blackbox flash logging overhead

In my last post I showed that Blackbox’s logging behaviour when writing to an onboard flash chip ends up adding a lot of variance to the looptime. This was because 3/4 of the time, Blackbox would just write its log entry to a write buffer in memory, which was very fast, but the remaining 1/4 of the time it would have to flush that buffer through to the flash chip itself, which was very slow. The difference in speed between these iterations causes a variance in the looptime which is undesirable for stable flight. This caused the distribution of overhead due to Blackbox logging to have a twin-peaked shape like this:

Blackbox overhead from logging to flash

One way of solving this problem is to use the CPU’s DMA controller to send the write buffer out to the flash in the background. This way the buffer can be slowly written to the flash chip all the time while other tasks are executing, instead of the whole CPU pausing to make one big slow write every now and then. That’s still something I want to implement in the future, but in the meantime I looked into other ways to reduce the variance.

Continue reading Improving variance in Blackbox flash logging overhead

Measuring Blackbox logging overhead and looptime variation

If you want the absolute fastest looptime possible on Cleanflight, you need to be aware of the additional execution time cost that various features add on.

One great feature for tuning your craft’s performance is the Blackbox flight log. However, the choice between logging to an OpenLog device or to an onboard flash chip brings with it quite different performance impacts, and you may need to factor this in when you’re choosing your logging device.

Continue reading Measuring Blackbox logging overhead and looptime variation

Flying the Libelle DLG on a slope

Ready to fly with the Libelle DLG and Taranis transmitterEver since I received my Libelle, I’ve only been flying discus-launch on flat land in calm wind, but last night I saw the forecast for today was for a nice 10km/hr westerly wind and clear sunny skies. I had a hunt around on Google maps and finally found a west-facing slope. It’s a big hillside with a series of switchbacks and jumps carved into it as part of a downhill BMX race course, in Dunedin, New Zealand.

And indeed, when I got there a 10-20km/hr wind was blowing almost directly up the slope to me. I gave the Libelle a lazy javelin toss and wow! It zoomed straight up into the air. Suddenly, compared to flat-land, I had almost infinite power available. I even managed an aileron roll, although it seemed to hesitate forever at the halfway point. I quickly learned the importance of always making your turn into the wind instead of back towards the slope, as it wipes off a ton of airspeed/altitude if you do it the wrong way. Luckily not enough to make me crash.

Eventually I managed to lose enough altitude that I had to land it, about halfway down the slope. Unfortunately the slope is lined with 2 metre tall toetoe bushes, so visibility was extremely limited and I couldn’t see the landing spot. I had to hunt through gorse bushes in order to find it again. Once I got within 10 metres of it I was able to waggle the ailerons and immediately hear the servos whirring further down the bank. Nice gentle landing in grass:

Tidy crash landing

I gave the control surfaces a quick check and then it was back in the air!

Unfortunately, 15 minutes after that first sunny photo was taken, a dark raincloud started rolling up the valley and it started to rain on me. I was going to brave it out, but my lift started dropping. I couldn’t manage to land it somewhere nice where I could guarantee I wasn’t going to get gouged by gorse again, so I decided to land it on that playing field you can see way the heck at the bottom of the hillside. (maybe 125m vertical).

Wow, depth perception is difficult at that distance! I set flaperons for landing, and I was like “Okayyyy…. touchdown! No? Tttt…….ouchdown! No?? What?”. Finally I made a perfect landing (pretty much by chance). It’s the tiny white speck you can see on the field through the rain:

The rain rolls in and I land in the field

Unfortunately the field turned out to be composed of 95% moss, it was basically a sodden swamp. My shoes have seen better days. Can’t wait to go back!

Libelle back in the air!

So, I previously wrecked my Libelle pretty hard, tearing both the wings and the nose cone in half. I’ve now repaired both of those using Gorilla Glue, which worked excellently. The glue foams up, so there is still some excess here and there that I haven’t sanded off yet.

I’m happy to say that it’s now back in the air!

4g9WUs0

I’ve been flying it until the battery runs flat for the past three days, and having a blast. My discus technique is slowly improving, though I’m still doing poorly compared to those I see on YouTube. I might take a video one day and get your guys’ suggestions. I haven’t found a thermal at my flying field yet, I might start hunting further abroad.

I’m now running proper flaperon mixes on my Taranis to give me Thermal and Landing modes according to the deflections specified in the excellent included manual, so my landings can now be much more gentle.

I noticed that since I re-glued the wings, their angle is offset compared to the tailplane, which obviously is not a good thing. One of the plastic mounts snapped in half when the wing did, so there’s not as much holding them in alignment any more. For the moment, I’m just going with the flow and flying counter-clockwise circuits to match the craft’s bias.

I managed to lose the carbon fibre launch peg, so I replaced it with a section of cheap paintbrush handle, which happened to be tapered so I could find a precise fit from halfway down the brush :).